> ## Documentation Index
> Fetch the complete documentation index at: https://help.neurapulse.com/llms.txt
> Use this file to discover all available pages before exploring further.
# Taking action
# Taking Action on High-Risk Results
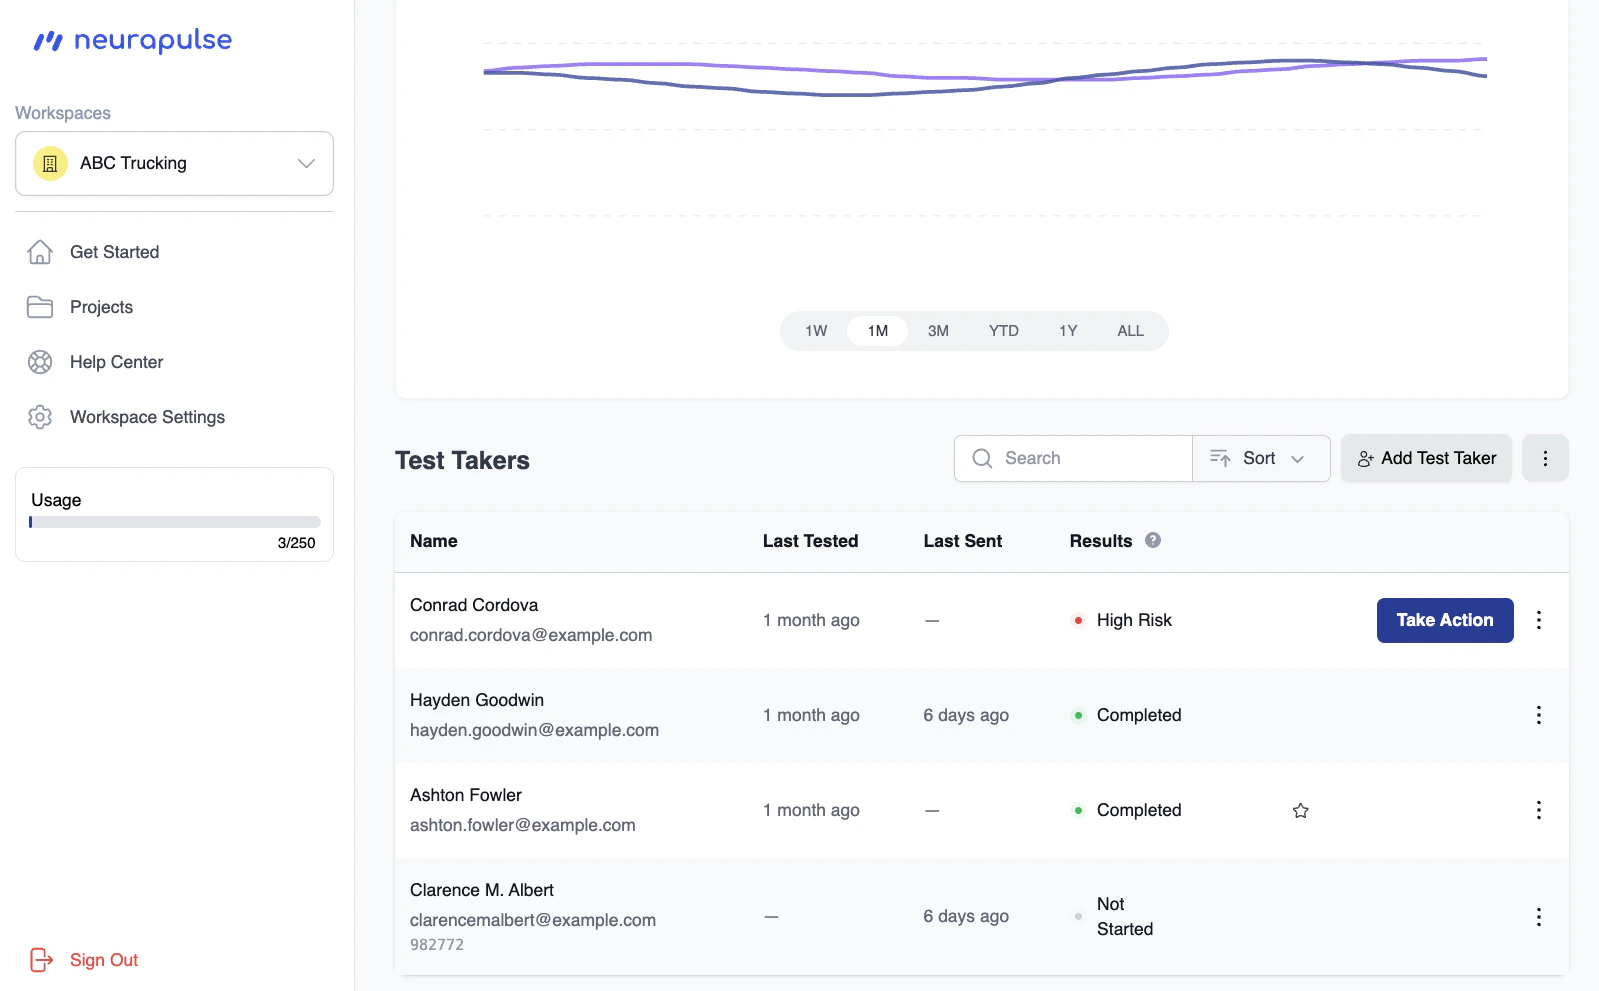
When a test taker is flagged as **High Risk**, a **Take Action** button appears in the project entry table. This guides you through a structured response process to assess and address the situation appropriately.
## Where to Find the Button
The **Take Action** button appears in the test taker table next to any result with a confirmed, unaddressed high-risk status.
 What happens after you click it depends on your project's **Fit For Duty Response** setting:
* **Custom** — you'll see your organization's configured policy and complete the process with a single acknowledgement
* **Default** — you'll be guided through an investigation and choose a specific response path (Fatigue, Emergency, etc.)
***
## Custom Fit For Duty Response
This section only applies if your project's Fit For Duty Response is set to
**Custom**. If your project uses the Default setting, skip to
[Investigation](#investigation) below.
If your project has a custom response configured, the first screen displays your organization's Fit For Duty policy — either as plain text or as a link to an external document.
Click **I acknowledge** to confirm you have reviewed the policy. This completes the process and the entry updates to **Acknowledged**.
***
## Default Fit For Duty Response
This section only applies if your project's Fit For Duty Response is set to
**Default**. If your project uses a Custom setting, see [Custom Fit For Duty
Response](#custom-fit-for-duty-response) above.
When using the Default setting, clicking **Take Action** starts a guided multi-step process:
1. **Investigation** — assess the test taker in person using structured prompts across three pathways (Emergency, Fatigue, or Health & Emotional Distress)
2. **Choose an action** — select the response path that best matches your findings
3. **Follow the guidance** — work through the recommended steps for the chosen path
4. **Finish** — click **Finish** to record the outcome and close the process
The sections below walk through each step in detail.
***
## Investigation
The Investigation screen guides you through an in-person assessment before choosing a response. If the test taker has a phone number on file, an emergency call button will be available at the top.
What happens after you click it depends on your project's **Fit For Duty Response** setting:
* **Custom** — you'll see your organization's configured policy and complete the process with a single acknowledgement
* **Default** — you'll be guided through an investigation and choose a specific response path (Fatigue, Emergency, etc.)
***
## Custom Fit For Duty Response
This section only applies if your project's Fit For Duty Response is set to
**Custom**. If your project uses the Default setting, skip to
[Investigation](#investigation) below.
If your project has a custom response configured, the first screen displays your organization's Fit For Duty policy — either as plain text or as a link to an external document.
Click **I acknowledge** to confirm you have reviewed the policy. This completes the process and the entry updates to **Acknowledged**.
***
## Default Fit For Duty Response
This section only applies if your project's Fit For Duty Response is set to
**Default**. If your project uses a Custom setting, see [Custom Fit For Duty
Response](#custom-fit-for-duty-response) above.
When using the Default setting, clicking **Take Action** starts a guided multi-step process:
1. **Investigation** — assess the test taker in person using structured prompts across three pathways (Emergency, Fatigue, or Health & Emotional Distress)
2. **Choose an action** — select the response path that best matches your findings
3. **Follow the guidance** — work through the recommended steps for the chosen path
4. **Finish** — click **Finish** to record the outcome and close the process
The sections below walk through each step in detail.
***
## Investigation
The Investigation screen guides you through an in-person assessment before choosing a response. If the test taker has a phone number on file, an emergency call button will be available at the top.
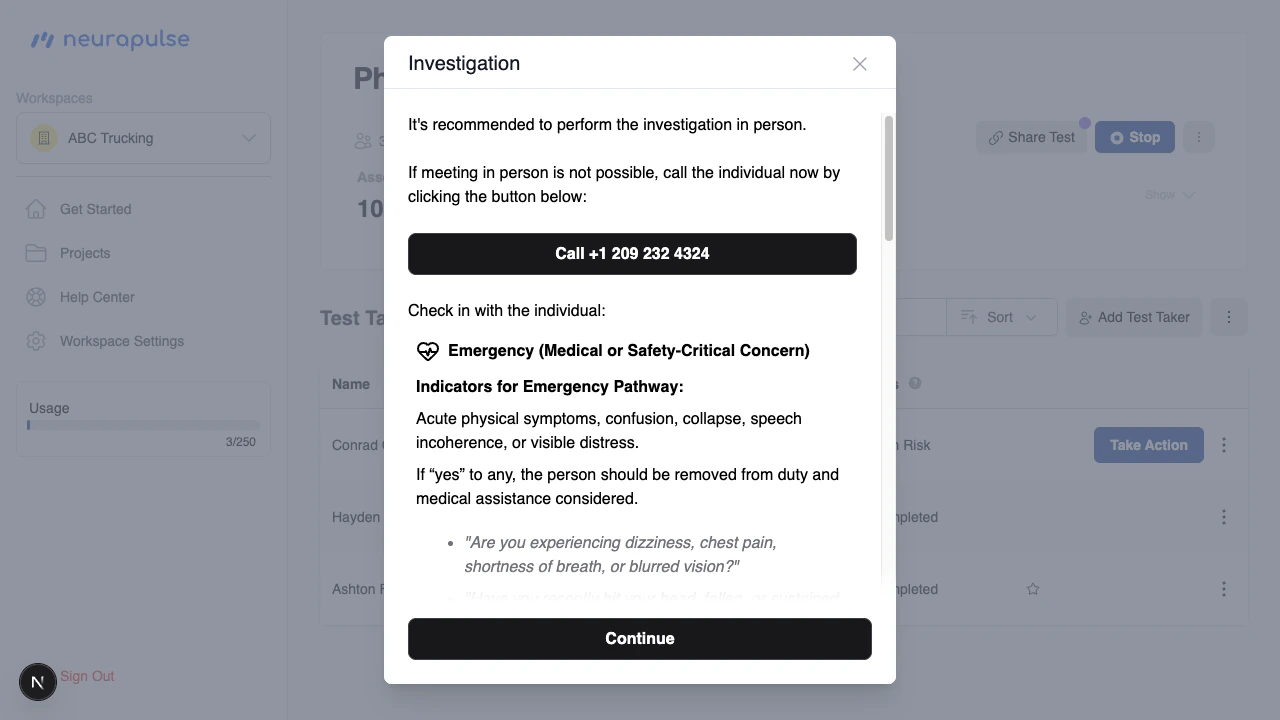 Three investigation pathways are shown to help you identify the most likely cause:
### Emergency (Medical / Safety-Critical)
Look for acute physical symptoms such as confusion, collapse, incoherent speech, or visible distress. Use the provided sample questions to screen for medical concerns.
### Fatigue / Alertness
Look for signs of insufficient rest, extended duty hours, slow responses, or self-reported tiredness. Use the provided sample questions to assess fatigue level.
### Health & Emotional Distress
Look for emotional agitation, illness, personal distress, recent trauma, or mood disturbance. Use the provided sample questions to evaluate the test taker's wellbeing.
Once you have completed your assessment, click **Continue** to choose an action.
***
## Choosing an Action
Based on your investigation, select the response path that best fits the situation. The screen provides on-screen guidance and a sample script for each path. When you click **Finish**, the test taker's status in the table updates to reflect the action taken — so you and your team have a clear record of how the situation was handled.
Three investigation pathways are shown to help you identify the most likely cause:
### Emergency (Medical / Safety-Critical)
Look for acute physical symptoms such as confusion, collapse, incoherent speech, or visible distress. Use the provided sample questions to screen for medical concerns.
### Fatigue / Alertness
Look for signs of insufficient rest, extended duty hours, slow responses, or self-reported tiredness. Use the provided sample questions to assess fatigue level.
### Health & Emotional Distress
Look for emotional agitation, illness, personal distress, recent trauma, or mood disturbance. Use the provided sample questions to evaluate the test taker's wellbeing.
Once you have completed your assessment, click **Continue** to choose an action.
***
## Choosing an Action
Based on your investigation, select the response path that best fits the situation. The screen provides on-screen guidance and a sample script for each path. When you click **Finish**, the test taker's status in the table updates to reflect the action taken — so you and your team have a clear record of how the situation was handled.
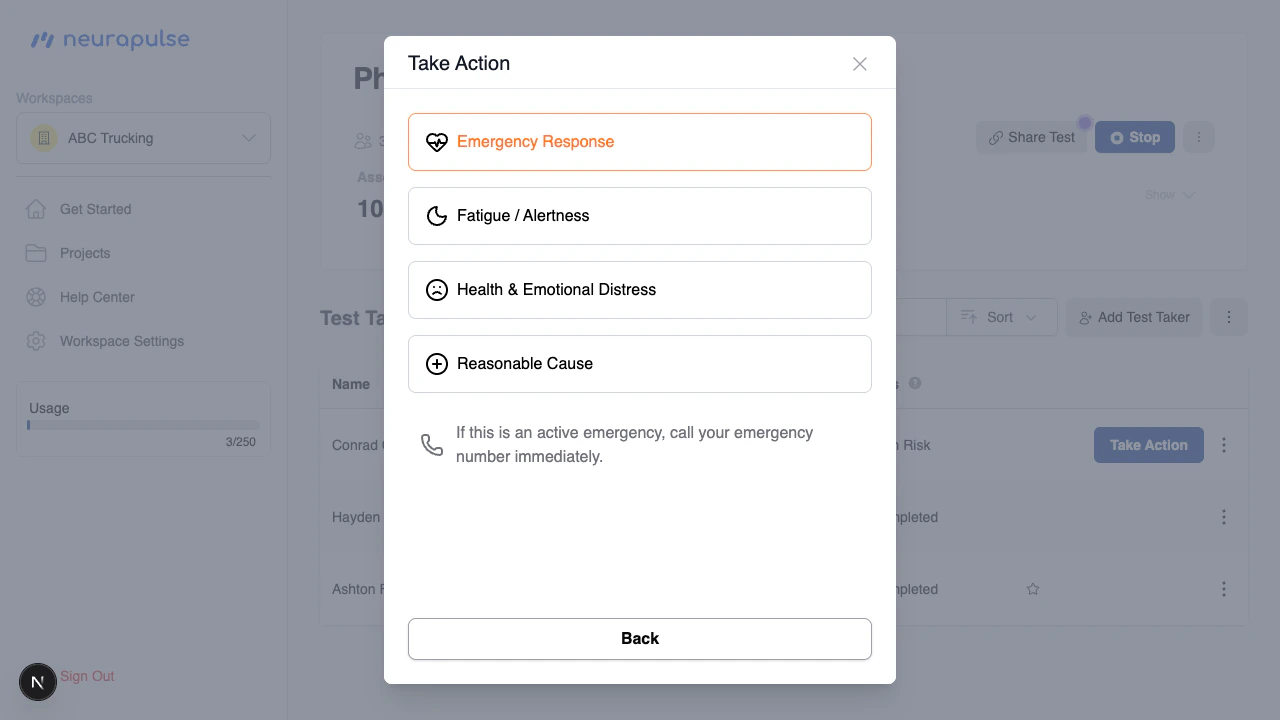 If an active emergency is in progress, call your emergency number immediately
— do not wait to complete this process.
### Emergency Response
For active medical emergencies or safety-critical symptoms. The screen will prompt you to call emergency services, keep the worker seated, document observations, and notify the relevant parties (Supervisor, Safety, HR, Operations). Clicking **Finish** sets the test taker's status to **Emergency**.
### Fatigue / Alertness
For workers showing signs of insufficient rest or reduced alertness. The screen walks through remediation steps: confirming work hours, arranging a rest period, providing hydration, and reassessing the worker afterward. You can also send a retest directly from this screen. Clicking **Finish** sets the test taker's status to **Fatigued**.
### Health & Emotional Distress
For workers showing signs of emotional distress or a non-emergency medical concern. The screen guides you through reassignment options, early end-of-shift arrangements, and contacts such as EAP or HR. Clicking **Finish** sets the test taker's status to **Distressed**.
***
## Reasonable Cause Process
Use this path when you have observable evidence of impairment that warrants formal documentation.
### Step 1 — Document
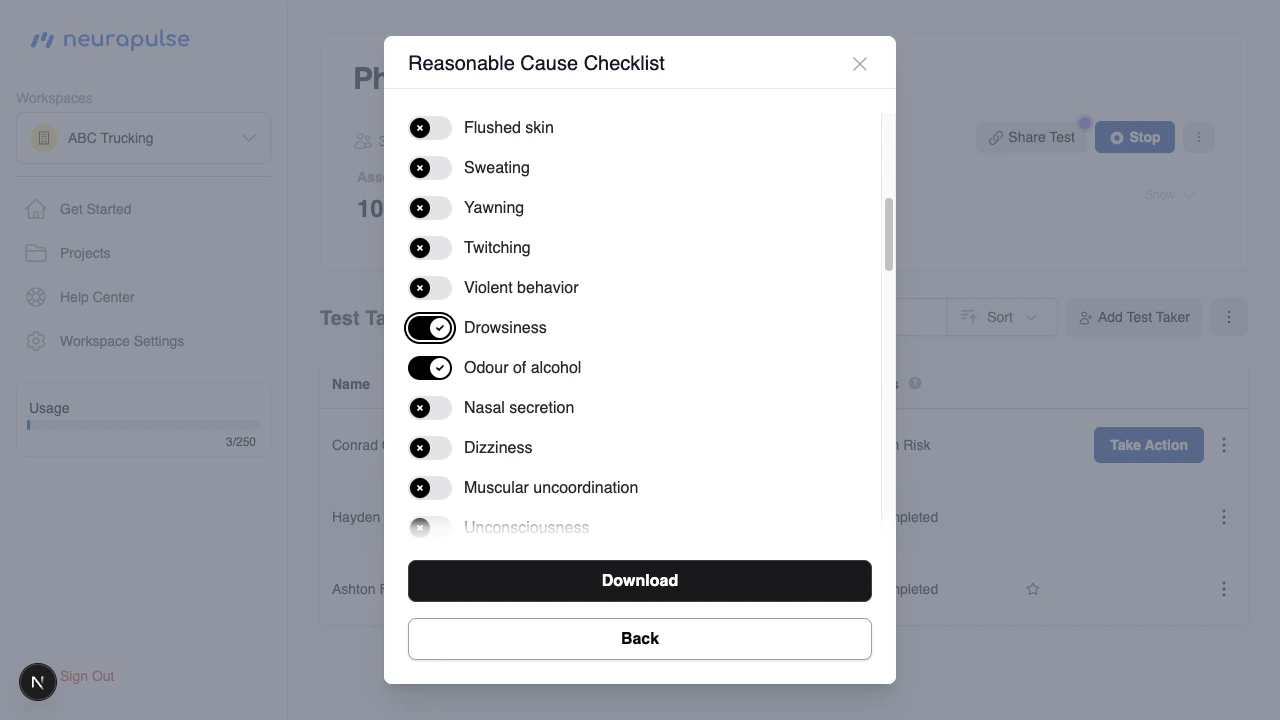
Observe and listen for signs of impairment and capture any statements made by the worker. Click **Open Checklist** to record your observations using the Reasonable Cause Checklist.
#### Reasonable Cause Checklist — Indicators
The checklist includes 27 observable indicators across three categories: physical, behavioural, and evidence-based. Toggle each indicator that applies and add any additional notes in the free-text field.
If an active emergency is in progress, call your emergency number immediately
— do not wait to complete this process.
### Emergency Response
For active medical emergencies or safety-critical symptoms. The screen will prompt you to call emergency services, keep the worker seated, document observations, and notify the relevant parties (Supervisor, Safety, HR, Operations). Clicking **Finish** sets the test taker's status to **Emergency**.
### Fatigue / Alertness
For workers showing signs of insufficient rest or reduced alertness. The screen walks through remediation steps: confirming work hours, arranging a rest period, providing hydration, and reassessing the worker afterward. You can also send a retest directly from this screen. Clicking **Finish** sets the test taker's status to **Fatigued**.
### Health & Emotional Distress
For workers showing signs of emotional distress or a non-emergency medical concern. The screen guides you through reassignment options, early end-of-shift arrangements, and contacts such as EAP or HR. Clicking **Finish** sets the test taker's status to **Distressed**.
***
## Reasonable Cause Process
Use this path when you have observable evidence of impairment that warrants formal documentation.
### Step 1 — Document
Observe and listen for signs of impairment and capture any statements made by the worker. Click **Open Checklist** to record your observations using the Reasonable Cause Checklist.
#### Reasonable Cause Checklist — Indicators
The checklist includes 27 observable indicators across three categories: physical, behavioural, and evidence-based. Toggle each indicator that applies and add any additional notes in the free-text field.
 #### Reasonable Cause Checklist — Determination
Answer the six yes/no determination questions to establish whether reasonable cause exists.
Do not proceed with reasonable cause testing unless **all six questions** are
answered YES.
Select the appropriate conclusion (reasonable cause established, not established, or other) and click **Download** to generate a preview of the completed checklist.
#### Reasonable Cause Checklist — Determination
Answer the six yes/no determination questions to establish whether reasonable cause exists.
Do not proceed with reasonable cause testing unless **all six questions** are
answered YES.
Select the appropriate conclusion (reasonable cause established, not established, or other) and click **Download** to generate a preview of the completed checklist.
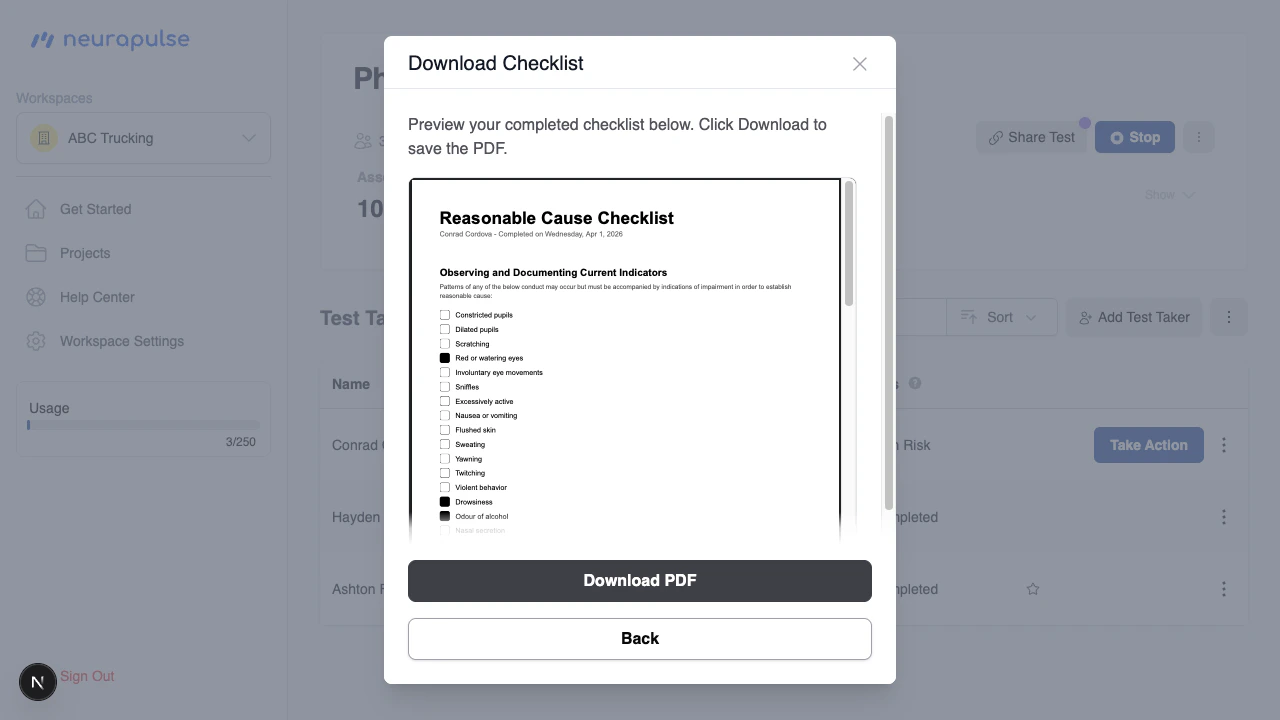 Click **Download PDF** on the preview screen to save the file to your device.
### Step 2 — Advise
Inform the worker that they are being referred for reasonable cause testing. A sample script is provided on screen to guide this conversation.
Click **Finish** to record the outcome.
***
## Escalation
Escalation is triggered **automatically** when a worker has two or more consecutive high-risk results within a 7-day window. In this case, the system routes directly to the Escalation screen instead of the standard flow.
Follow your organization's internal fitness-for-duty policy. If your workspace has an escalation policy document configured, click **Open Policy** to view it.
Choose one of the following next steps:
* **Drug & Alcohol Testing** — arrange pick-up and transport to a testing facility
* **Medical** — arrange pick-up and transport to a medical facility
Click **Finish** to record the outcome.
Contact your HR or safety team if you are unsure which escalation path to
follow for your organization.
Click **Download PDF** on the preview screen to save the file to your device.
### Step 2 — Advise
Inform the worker that they are being referred for reasonable cause testing. A sample script is provided on screen to guide this conversation.
Click **Finish** to record the outcome.
***
## Escalation
Escalation is triggered **automatically** when a worker has two or more consecutive high-risk results within a 7-day window. In this case, the system routes directly to the Escalation screen instead of the standard flow.
Follow your organization's internal fitness-for-duty policy. If your workspace has an escalation policy document configured, click **Open Policy** to view it.
Choose one of the following next steps:
* **Drug & Alcohol Testing** — arrange pick-up and transport to a testing facility
* **Medical** — arrange pick-up and transport to a medical facility
Click **Finish** to record the outcome.
Contact your HR or safety team if you are unsure which escalation path to
follow for your organization.